Thursday, 19 July 2012

How to Sync Your Media Library to Your Android Phone


How to Sync Your Media Library to Your Android Phone

Here's how to sync your photos, videos, and music to your Android phone with DoubleTwist for Windows.

How to Sync your Media Library to your Android PhoneiPhone users have iTunes, but Android users must figure out their own syncing arrangement. Of the numerous Android syncing programs out there, I recommend trying DoubleTwist first. DoubleTwist reliably gets the job done with minimal hassle. I've found no other comprehensive media-syncing tool that costs nothing, offers such a clean and functional interface, and works with most Android phones. What's more, if you're willing to shell out $5, you can pick up a companion app that enables Wi-Fi syncing. Here’s how to get started.
Step 1: Download and install DoubleTwist for PC. Although a free DoubleTwist media-player app is available for Android, you need only the desktop version to set up sync.
Step 2: Launch DoubleTwist, and it will scan your PC for media. You can import music, photos, and videos that the program does not automatically find, as well as playlists from iTunes and Windows Media Player, by exploring the Library menu.
Step 3: Connect your Android phone to your PC via USB, and then click the status bar and set your phone to USB Mass Storage or Disk Drive mode. You’ll see your phone under Devices in DoubleTwist.
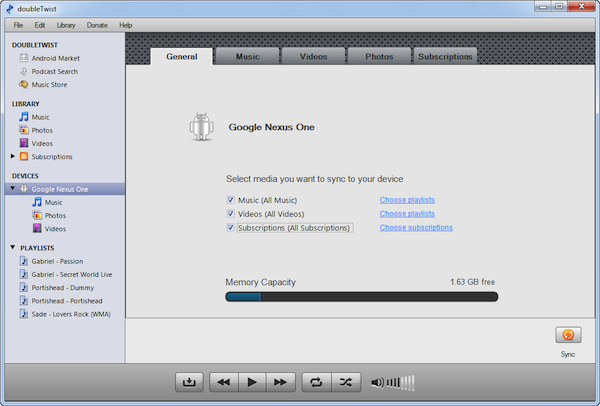
Syncing music and photos with DoubleTwist.Syncing music and photos with DoubleTwist.
Step 4: Click the name of your Android phone to open sync options. You can sync all or part of your media collection by browsing tabs (Music, Photos, Videos), choosing options, and clicking the Syncbutton. Notice that you can have DoubleTwist import new media from your phone during the sync. If you prefer, you can also drag and drop individual files between the DoubleTwist Library and your device.
If you want to enable wireless sync with the $5 DoubleTwist AirSync app, you can set it up in three easy steps.
Step 1: Connect your computer and phone to the same wireless network.
Step 2: Launch AirSync, and select Yes to set up Wi-Fi pairing.
Step 3: Click the name of your phone under Devices in the DoubleTwist desktop program. Enter the passcode displayed on your phone. You can now perform the same syncing operations described above.
Having problems syncing? Note that DoubleTwist will not transfer files protected by DRM.

Sync Browser Bookmarks Between Windows and Android


Sync Browser Bookmarks Between Windows and Android

How to keep the same browser bookmarks on his PC and his Android phone

Let's take this problem one PC browser at a time.
Firefox
This one's easy. In Firefox, on the PC, select Tools (if you don't see menus at the top of the window, tap ALT)then Set Up Sync. Fill out the form, sticking to defaults when you're not sure.
Firefox for Android
Then install Firefox for Android on your phone.

When you first launch your new browser, click Set Up Sync. You'll get a screen with three codes. On the PC, select Tools, then Options.Click the Sync tab. click Pair a Device and enter the codes.
Chrome
You'd think that one Google product would easily sync with another. But, alas, you'll need third-party software--and a Google account (such as Gmail).
On the PC, in Chrome:
  1. Click the tool icon in the upper-right corner and select Options.
  2. In the left pane, click Personal Stuff.
  3. In the "Sign in" section, make sure you're signed in as yourself.
  4. Click the Advanced… button and make your sync choices. You want Bookmarks checked. You may or may not want the others.

Chromemarks
On the phone, go to the Play Store (formerly called the Android Market) and download and install either ChromeMarks or ChromeMarksLite. Click here to decide which one you want.

You should have no trouble setting it up.
Your bookmarks won't show up in the browser. But when you click one in ChromeMarks, the page will open in your browser.
Internet Explorer
I have yet to find a satisfactory way to do this, except…
The All-Browser Option
The online service XMarks will sync your bookmarks across multiple browsers and platforms. On the PC side, you can install XMarks add-ins for various browsers.
The basic XMarks service is free, but it doesn't support phones. For that, you'll need the shell out $12 a year for the Premium service.
As with ChromeMarks, you use the XMarks app to find and select bookmarks, which then launch in your browser of choice.

How to Migrate From BlackBerry to Android


How to Migrate From BlackBerry to Android


How to Migrate From BlackBerry to Android
Finally jumping ship, huh? For better or for worse, you’re not alone: If market reports are anything to go by, Android phones have carved out about three-quarters of BlackBerry’s market share in just a few years.

Setting Up Email
Before you begin migrating your life from your BlackBerry to your new Android device, I’d like to review the main difference between BlackBerry and Android hardware. All BlackBerry devices have keyboards, but only some models have touchscreens; on Android it’s the opposite, with every Android device sporting a touchscreen but fewer and fewer coming equipped with keyboards. Although most people seem to have gotten used to typing on a touchscreen, I’m not one of them, and if you aren’t either you might want to look at our collection of the best smartphones with a full QWERTY keyboard for assistance in making a purchase.
Now, moving on to software. First--and probably most important for a majority of BlackBerry users--you have to set up your email accounts on your new Android device. Google really wants you to use Gmail, and the majority of Android phones are designed to reflect this, with a friendly home-screen Gmail icon that needs only your username and password to be effectively configured.
If you don’t already have a Gmail account for personal email, by all means make one--it’s a great service, and you’re going to need it anyway to sync your Outlook calendar. If you already have a Gmail account, you may want to consider persuading your IT department to forward all of your business mail to Gmail automatically; many companies balk at this notion because they’d rather not have their mail travel through Google’s servers, but the fact is that you could do a lot worse, and anybody who can arrange this option is rarely unhappy with it.
If you decide not to go that route, you’ll have to use the alternate email application installed on Android phones. Depending on your version of Android, this application may be called 'Email' or 'Mail', but it’ll certainly be present; open your App Drawer (the scrolling list of all the apps that you have installed), and take a look. While the setup options for the Email app seem simple (and they actually are, if you’re using them to configure a common email address such as one from Yahoo), you’ll probably need some technical information from your IT folks to configure a corporate email server. If your office uses Outlook for mail on your desktop PCs, you likely have a Microsoft Exchange server. Microsoft provides some good, straightforward instructions for configuring Exchange email. The only information you’ll need that you might not have already is your email server name, and you should be able to find that information by clicking Help, Aboutin Outlook and checking under the 'External POP Settings' line. If the setup process asks whether to use a secure connection and to accept any SSL certificates, it’s a good idea to say yes to both. Input the necessary information, finish the setup process, and you should be all set.
How to Migrate From BlackBerry to AndroidThis screenshot shows the generic 'Email' app in the bottom-right corner of my App Drawer, with the App Drawer icon (unlabeled) in the bottom left.

Importing Contacts and Calendars

Next, you should import your contacts and calendars. The easiest way to do this is to go to http://m.google.com/sync on your BlackBerry device’s browser; this action will automatically install the software to begin syncing your contacts and calendars with Google’s cloud. Once the Google Sync app is installed, open it, input your Gmail account details, check the app settings to ensure that both Contacts and Calendar are checked, and press Sync Now. If you don’t intend to keep using the BlackBerry, you can go ahead and power it down for the final time after sync has completed, as you won’t need it anymore. You can and should also install the desktop version of Google Sync so that your new phone can remain automatically synced to your Outlook calendar--no docking or wires needed. Once this sync is complete, open the Calendar app on your Android phone, and see what you think!
How to Migrate From BlackBerry to AndroidGoogle Sync on BlackBerry

Acquiring Apps

Finally, you’re going to need some replacements for your favorite BlackBerry applications. If you're interested in handling your office documents on the go, check out our basic guide tomanaging documents on your Android phone. You might also like the Evernote app for keeping track of memos and automatically syncing them to a desktop computer. Unfortunately, you can’t use BlackBerry Messenger on Android, but you can install Skype from the Google Play store (the equivalent of BlackBerry App World); Google also provides its own replacement, called Talk, which automatically makes you available for chat with anyone you’ve corresponded with via Gmail. If that doesn’t sound like something you want, just open the Talk app, go to the Settingsmenu, and uncheck Automatically sign in.
You should try to use your Android phone on wireless networks when they’re available, such as at home, in order to save on data consumption and battery life (if you weren’t already in the habit of doing so with your BlackBerry). On most Android phones, the Wi-Fi configuration is somewhat unhelpfully buried under Menu, Settings, Wireless and Networks, Wi-Fi Settings(where you’ll probably want to uncheck Network notification so that your phone will stop shouting about new networks being available). It’s easy to set up, though: Just click on the network you want, and enter the password.
After that, all that’s left is for you to get used to the Android interface. You’ll probably find that it’s quite nice--tapping and dragging are both very intuitive, and judicious use of the Back button at the bottom of your device will help you speed through menus. To access the notifications at the top of your screen (one of the best features of Android), simply drag them down and tap them individually.
Congratulations on your move, and good luck!

Android 101: A Guide to Using Your Android Phone


Android 101: A Guide to Using Your Android Phone

Ready to get started with your Android phone? This walk-through will have you up and running in no time.

The Desktop

The first thing you'll notice about Android is that its desktop differs somewhat from those on other smartphone platforms. You have a lot of freedom to customize the Android desktop-and you aren't limited to four simple rows of perfectly aligned square icons. As a result, you can customize the Android desktop to reflect your interests, and you can make it as full and dynamic as you like.

The Android desktop is composed of multiple homescreen panels. Depending on the version of Android that your phone uses and on whether your device has a specialized overlay such as MotoBlur, you may have five to seven home-screen panels.
When you power up your phone for the first time, you'll see the main homescreen panel. This panel is typically centered, and you can access additional panels on either side of the main one by swiping your finger left or right. What goes on the homescreens is up to you. You can fill the space with any combination of shortcuts, widgets, and folders.
As you'd expect, short-cuts are small icons that let you load apps or other functions on your phone; they function much like the ones you see on a PC desktop. You can set a shortcut to do anything from opening a program to linking to a specific Web page to initiating a phone call.
To add a shortcut, simply press and hold your finger on any open space on your home screen, and select Shortcuts from the resulting pop-up menu. From there, select Applications (to add an app), or Direct dial or Direct message (to create a shortcut for calling or texting a friend), or Bookmark (to open a Web page), or Directions (to activate turn-by-turn navigation to a specific destination).
Widgets are dynamic programs that operate directly on your homescreen. They can perform any number of functions-giving you the latest weather, for example, or letting you play music from either your personal collection or from the Internet. Should you want more, you can download additional widgets from the Android Market.
To add a widget, press and hold your finger on an open space, as you would to create a shortcut (above). This time, though, select the Widgets option from the pop-up menu. Even if you haven't downloaded anything from the Android Market, you should have a handful of options built into your phone. Start by adding the Power Control widget; it creates a handy dandy one-touch toggle control for you phone's Wi-Fi, Bluetooth, GPS, data syncing, and screen brightness.
Folders are a good way to keep your content organized while simultaneously expanding your homescreen space. A folder lets you group multiple shortcuts in a single space. When you tap on a folder, a box pops up showing all of the shortcut icons inside that folder. You can fill one folder with one-touch dialing shortcuts to all of your favorite contacts, and another, perhaps, with various phone-number lookup utilities. Folders help you add many useful things to your homescreens without eating up a lot of space.
To add one, press and hold your finger on an open space. Select Folders, and then New Folders. Then drag and drop as many shortcuts into the folder as you wish. To give it a custom name, tap the folder once to open it, and then hold your finger along the top bar until the Rename folder dialog box appears on your screen. To move any shortcut, widget, or folder, simply touch and hold your finger to it. After a couple of seconds, it will seem to lift up from the screen. You can then drag it anywhere, including to another panel and drop it wherever you like. As you drag and drop, you'll also see a trash symbol at the bottom-center of the screen; slide any icon down onto the trash symbol to remove it from the homescreen altogether.

Getting Around

Android phones have four standard keys: a Back button, a Menu button, a Home button, and a Search button. These keys will help you navigate through your phone more easily, no matter what program or process you're running.
Pressing the Back key takes you back one step to whatever you were doing prior to the beginning of your current step. It works in Web navigation, e-mail navigation, or navigation to a previously open program.
Pressing the Menu key brings up a list of options relevant to the area of the phone you're currently using. When you press it on the homescreen, it permits you to access your phone's settings and other customization options.
The Home key has two functions: If you press it once, it takes you back to your home screen. If you press and hold it, it allows you to multitask and switch to other programs you've recently used.
Pressing the Search key produces different results depending on where you are in Android at the time. From your home screen, it brings up a Quick Search Box that you can use to search the Web and your phone at the same time (Android will return the most relevant results from either domain as you type). From within an app, the Search key typically starts a search specific to that program-enabling you to search exclusively within your e-mail, for example, or within your contacts list.

The App Launcher

You can always find all of your apps in the app launcher. To open the launcher, simply tap the square icon at the bottom of the screen. The launcher looks different depending on what version of Android you have, and whether or not your phone has a custom overlay.
Within the app launcher, you can tap any app's icon to run the program, or press and hold it to drag it directly onto the home screen as a shortcut.

Notifications

Android's notification panel puts incoming information at your fingertips, no matter what you're doing. Notifications can come from many different places: e-mail, voicemail, text messaging, even social network and news applications. When you get a new notification, an icon will appear at the top-left of your screen. You can pull down the panel to see detailed information about the notification and then take action if you wish.
Check the settings of various applications to see what kind of notifications they offer, and then customize them to work for you.

How to Run Android Apps on Your PC


How to Run Android Apps on Your PC

The BlueStacks Android App Player lets you run Android apps on your PC. We explain how to install it, how to transfer apps from your Android smartphone, and how to run them on a Windows system.

As the popularity of smartphones and tablets increases, so will our dependence on the myriad apps available for them. Whether the end result is a hot game, a handy price checker, or a useful contact manager, the constraints of smartphone and tablet designs and interfaces have forced app developers to find creative ways to present and access data.

Unfortunately, most apps created for smartphones or tablets aren't available for use on a PC. Some apps let you sync favorites or other personal data with a companion program or a somewhat equivalent application on a PC, but mobile apps and their PC counterparts are rarely the same.
Thankfully, Silicon Valley-based startup BlueStacks recently released an alpha version of what the company calls an app player--a PC program that enables users to download Android apps directly or transfer them from an Android-based smartphone or tablet to their PC. The BlueStacks app player essentially runs an instance of Android in a virtualized environment on the PC, so the apps act as though they're running on a mobile device. If that's something you'd like to try, here's how to set it up.

Getting Started With BlueStacks

Using the BlueStacks app player is relatively straightforward, but there are some quirks involved with getting apps from a mobile device to a PC which we'll go into a little later. To use the BlueStacks app player, you must first download it from the BlueStacks website or from PCWorld's Downloads Library. Then run the BlueStacks app player installation file, and follow the on-screen prompts to complete the installation. Keep in mind that the BlueStacks app player is still in the early phases of development, so you can expect some minor performance issues and perhaps a bug or two.
BlueStacks app player The alpha version of the BlueStacks app player will run full-screen on a Windows PC. Future versions of the player will run in a window and will even permit shortcuts directly to Android apps.
When the installation is complete, you'll see a short video describing how the BlueStacks app player works and how you can access a few key features. Though the video doesn't offer a ton of information, it's worth watching to ease your learning curve. The BlueStacks app player isn't terribly intrusive: It requires minimal space and consumes few system resources; but it does launch automatically with your PC, and it displays a status icon in the system tray. The app also connects automatically to BlueStacks servers. If you prefer not to have the player launch every time your PC boots up, you can disable the BlueStacks launcher via the Startup tab in the MSCONFIG tool (to access the tool, select Run from the Start menu, type msconfig, and press Enter).
Once you've installed the BlueStacks app player and configured it to your liking, you can start using the app player with the handful of apps preinstalled in it or with the few apps available for download within the BlueStacks 'Add more apps' channel. To access the downloadable apps however, you'll have to register for a free BlueStacks account with either a working email address or a Facebook account. The main allure of the BlueStacks app player is its ability to send apps from your Android device to your PC via the company's Cloud Connect mobile app and servers.

Transferring Your Android Apps to Your PC

To use the Cloud Connect mobile app to transfer Android apps from your mobile device to your PC, you have to know your BlueStacks PIN. When you register an e-mail address or Facebook account with the BlueStacks app player, the service will link a personal identification number (PIN) to your account. This PIN appears as soon as you register, as well as when you click the 'Cloud Connect' link within the 'Get More Apps' tool in the BlueStacks app player. To transfer apps from your Android device, launch the Android Market on your Android tablet or smartphone, and search for BlueStacks Cloud Connect. Download and install the Cloud Connect app on your phone or tablet; don't worry--it's only 402KB. With that app in place, you can send any other app that's installed on your mobile device to the BlueStacks app player on your PC. Essentially, the Cloud Connect app uploads selected apps from your phone to BlueStacks' servers, where your PC can then access and download them to your PC.
BlueStacks app player Transferring apps from a mobile device to the BlueStacks app player involves entering a personal code assigned to your account during registration, to link the PC and mobile device through BlueStacks’ servers.
To use BlueStacks Cloud Connect, simply launch the app and select all of the Android apps on your device that you'd like to upload for transfer to your PC. Then click the Sync button at the top of the interface, and wait for the apps to upload (all of the apps installed on the mobile device will be listed). The uploaded apps should be visible in the BlueStacks app player on your PC when you launch the 'Get More Apps' tool.
Note that sometimes the BlueStacks app player doesn't sync properly if it's already open on your PC when the Cloud Connect app on your mobile device uploads data. We found during testing that, when this issue arose, restarting the BlueStacks app player always resolved it.
Once your apps are uploaded and the app player has notified you that they're available, select Get More Apps from your BlueStacks app player's PC client and click the Cloud Connect link. From there, a screen should pop up that lists all of the apps you uploaded from your mobile device. Click the Subscribe button underneath each app, and you should be able to run your favorite Android apps from the app player on your PC.
BlueStacks app playerTo send your favorite mobile apps to the BlueStacks app player, select them in the BlueStacks Cloud Connect app on your phone or tablet, press the Sync button, and subscribe to them via the Cloud Connect menu link in the BlueStacks channel that opens when you click the 'Get More Apps' shortcut in the player.

The Best Office Alternatives for Android Tablets


The Best Office Alternatives for Android Tablets


If you fantasize about a life on the road unencumbered by laptops, their accompanying power bricks, and other heavy business gear, you're not alone. And now that a tsunami of tablets is flooding the market with models running a variety of operating systems, that fantasy is starting to look very plausible indeed. Mobile productivity suites bring the document-editing features of desktop suites like Microsoft Office onto the tablet, but are they ready for serious business? I tried four top options to find out.
To see how well tablet productivity suites work for practical document editing, I spent two weeks working almost exclusively in popular productivity apps for Android slates and iPads. I used the apps for daily writing as well as for viewing and editing spreadsheets, and I created a test presentation (something I don't normally do in the course of my work) in each app. I evaluated each app for its interface and ease of use, its compatibility with Microsoft Office, and its ability to sync with cloud services. Because we're interested only in apps with full editing capabilities, I did not evaluate free versions that merely view documents.
The Best Office Alternatives for Your Android Tablet
To avoid confusion, I'll discuss the two platforms separately. In this installment, I'll evaluate four Android apps: Google Docs, DataViz Documents To Go, ThinkFree Office Mobile, and Quickoffice Pro. In my other installment, I'll discuss four top productivity options for the iPad.

Before jumping in with the apps themselves, I'll tell you the single most important finding from all of this testing: If you're going to do a lot of typing on your tablet, you absolutely should get an external keyboard. Pretty much any Bluetooth keyboard will do the trick with Android, and if you have a tablet with a USB port (such as the Acer Iconia Tab A500), that makes almost any PC keyboard an input device for your tablet.

Google Docs

Google Docs for AndroidGoogle Docs is great for accessing your Google Docs Web account, but it lacks offline editing.
Google Docs has proven to be a serious, though somewhat flawed, alternative to Microsoft Office on the Web, so I was really interested to see how the Android app would perform, given that it's running on Google's own OS.

Disappointingly but unsurprisingly, Google Docs for Android doesn't do much of anything without a live data connection to Google Docs on the Web. While it's understandable that you can't open documents from your online Google Docs account without a connection, the fact that you can't cache documents for later editing or create new documents for later uploading makes it hard to think of this app as a full-featured editor. Offline editing, in my view, is a fundamental enough feature that its absence here seriously limits this app's usefulness.
What you actually get with Google Docs is an Android-friendly set of links to the Google Docs Web apps. The app itself is designed for phones, not tablets, so its six main buttons leave tons of empty space on the tablet screen. Once you're connected, however, the Google apps look good and play as nicely as you'd expect with the Android browser.
As I've documented elsewhere over the past few years, Google Docs has more than its share of compatibility issues with Microsoft Office document formats. It handily imports Office files for viewing and editing, and keeps simple files more or less intact, but saving those files as Office .docx, .xlsx, or .pptx files almost always introduces some sort of error in my experience. And if your document includes complex formatting that you'd like to preserve, you can pretty much count on disappointment.
If you're a Google Docs user on the Web, you should definitely download the free Google Docs app for Android, if only because it's the best app for that particular job. But if you're looking for a full-featured document editor with offline usability and great Microsoft Office compatibility, any of the other apps in this roundup will be a better choice.

ThinkFree Office Mobile

Despite its name, the full version of ThinkFree Office for Android is anything but free. It's $15, which puts it right in line with its offline-capable competitors in this roundup.
ThinkFree Office Mobile for AndroidThinkFree Office Mobile has great Microsoft Office document support. We hope to see tablet enhancements in a future version.
ThinkFree can read and write Microsoft Word, Excel, and PowerPoint formats, and it acts as a PDF viewer as well. It also includes integrated access to Google Docs, as well as access to ThinkFree Online, so you can use the Web-based apps when you're at a PC and the Android app when you're on the go. ThinkFree's Microsoft Office compatibility is solid, and I didn't encounter any noticeable formatting errors in the documents I sent back and forth between the Android app and Word, PowerPoint, and Excel. Even Excel charts looked as expected in ThinkFree.

Like most of the other apps in this roundup, ThinkFree is primarily designed for phones, but it works well on Android tablets too. The interface is clean and simple, even a little sparse, but easy enough to navigate. My one complaint on the menus is that the home tab offers no way to start a document or open an existing document; instead, you have to go to the My Docs, Online, or Google tabs. This strikes me as an oversight on ThinkFree's part, as it means you can't do much of anything that's worthwhile immediately upon launching the app.
ThinkFree falls short of getting a hearty recommendation from me because it crashed several times while accessing online services. Frequently, though not all the time, the app force-closed the moment I tapped the Google or Online tab. This happened exclusively on my Iconia tablet, and not on my HTC ThunderBolt phone.

Documents To Go

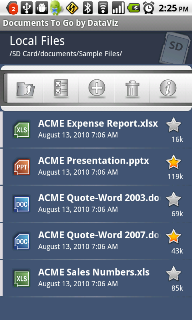
DataViz Documents To GoDocuments To Go is a mainstay among mobile office suites, and the Android version doesn't disappoint.
DataViz has been cranking out its Documents To Go mobile office suite for years, and the software remains one of the best document editors for smartphones. The latest update to the Android app brought some interface enhancements that tailored it a little better to Honeycomb tablets, giving it a distinct advantage over Google Docs and ThinkFree in its tablet interface.

Overall, however, despite its recent Honeycomb-friendly enhancements, the Documents To Go interface still feels like a small-screen UI stretched out to fill a larger display. With that said, Documents To Go is packed with useful context menus that give you just the options you need for the document you're working on, which makes it a good deal easier to work with than ThinkFree.
Documents To Go does an excellent job of handling Microsoft Office files from Word, Excel, and PowerPoint, and it includes the best Track Changes support I've seen on a mobile productivity app. It lets you store files locally, of course, but also syncs to your PC and accesses files stored on Google Docs with aplomb. Especially useful is the app's Starred Files feature, which makes it easy to mark important documents for quick retrieval later on.
For its rock-solid dependability and simple (though basic) context-sensitive interface, Documents To Go is tough to beat.

Quickoffice HD Pro (The Winner)

Only one app in this roundup has been designed specifically with Android tablets in mind, and that's Quickoffice HD Pro. The difference between a so-called HD app, fully designed for tablet displays, and a phone app that spreads out to fill a tablet screen is typically striking, and Quickoffice HD Pro is no exception. At $20, this app costs 33 percent more than its most serious competitors, but that extra $5 is chump change for the additional usability.
Quickoffice HD Pro for AndroidQuickoffice HD Pro is the best office-productivity suite yet for Android tablets.
From the moment you launch this mobile office app, it feels like it was made for the tablet (because it was). By contrast, the other three mobile productivity suites in this roundup--including Documents To Go, with its recent Honeycomb updates--look sparse and ill-fitting on a 9-inch display. Quickoffice HD Pro's tablet-centric menus drop down from the top as you would expect menus in a full-screen app to do. Objects in documents, such as photos and text boxes, include handles for easy resizing and repositioning, just as in their Microsoft Office counterparts. At every level, this suite is the best Android editing environment of the bunch.

In addition to Google Docs support, Quickoffice HD Pro includes support for Box, Dropbox, Huddle, SugarSync, and Apple MobileMe accounts. Hands down, this is the best lineup of cloud options among the four apps.
In its Microsoft Office formatting, Quickoffice HD Pro is on a par with ThinkFree and Documents To Go, and worlds better than the Google Docs app. It also reads PDF files, and it can open and browse zipped files as well.
If you have an Android tablet and you're serious about getting work done on the go, you'll want to grab two things: The first is a good Bluetooth keyboard (or a compact USB model, if your tablet supports it). The second is Quickoffice HD Pro
How to Maintain Your Android Phone


How to Maintain Your Android Phone

Android phones can become slow and clunky with age, but these tips can help get your phone running like new again.

Android phone maintenance
Your Android phone is a powerful computer. But like any other computer, it won't run at its best without proper care and maintenance. If you've ever owned an Android phone, you probably noticed that it became slower after a few months of use than it was when you first brought it home from the store. There are several reasons for this phenomenon, and in this article I'll explain how to get your Android smartphone back into tip-top shape. You can accomplish a lot of what I'll be recommending here by performing a simple factory reset; but if you take that approach, you'll lose your data and have to reconfigure your phone. So instead, grab your Android phone and follow these steps to get it running like new again.

Clear the Cache

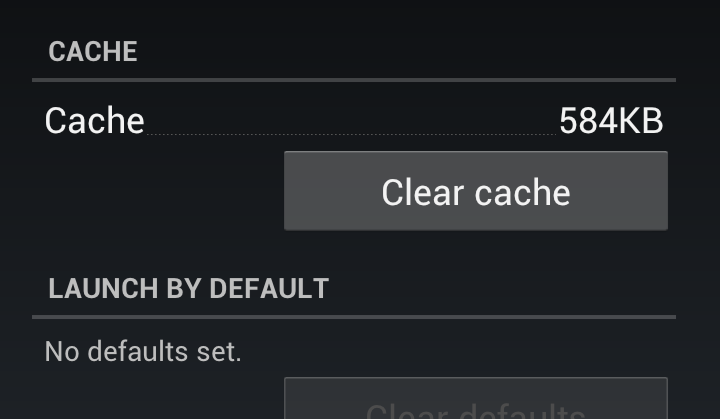
Android phone maintenance: Clearing the cache; click for full-size image.Android phone maintenance: Clearing the cache.
Have an app that's always crashing? Rather than force-closing or uninstalling it, try clearing its cache. This simple step will help resolve most of the issues that troublesome apps may be experiencing--and it won't create new problems, as forcing the app to shut down might. To clear an application's cache, open the Settings menu on your phone and click Applications. Then select Manage Applications and tap the app that's been having problems. Don't worry--all of your data and settings will remain intact; you're just getting rid of temporary files that may be causing difficulties.

Uninstall Apps

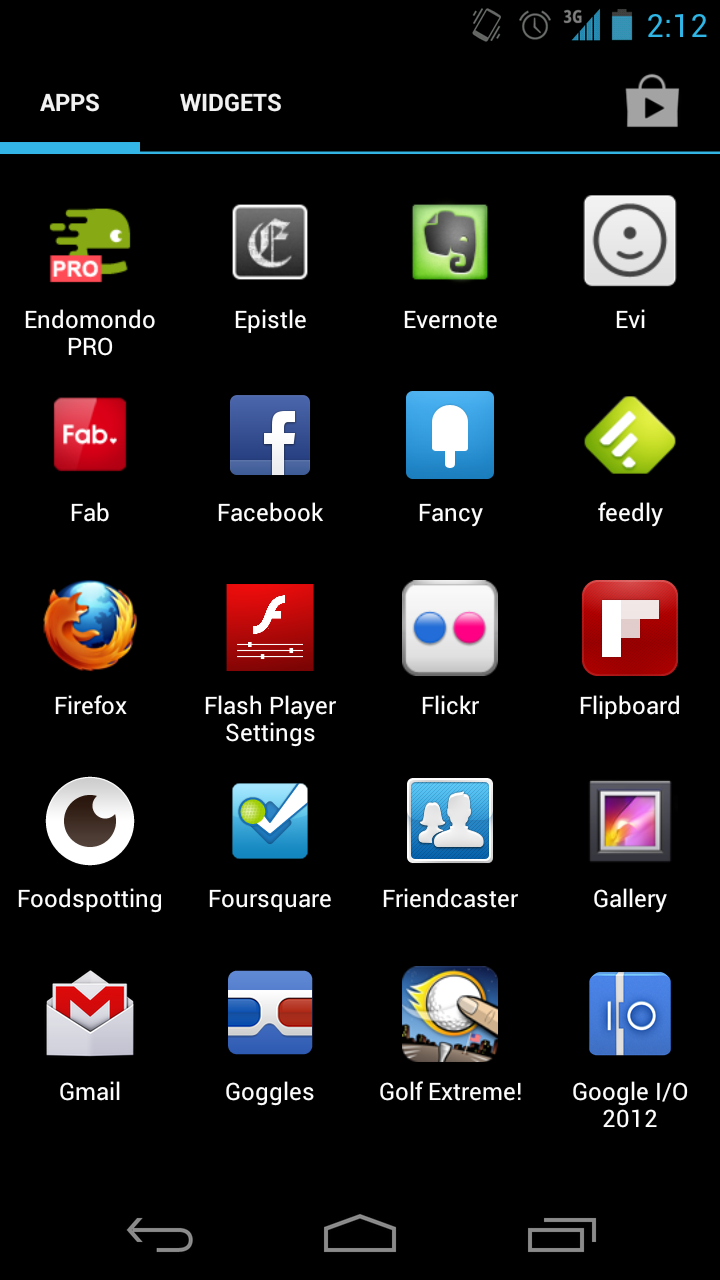
Android phone maintenance: Uninstalling apps; click for full-size image.Check your app drawer for apps you don't use or need.
Even though it's my job to love apps (and I do love them), improperly written ones can cause all sorts of trouble for your Android phone. Built-in problems can range from storing critical data as a plain-text file in your memory card to sullying your notification bar with constant updates that can't be disabled.

Consider the official Facebook app: Opening it automatically turns on your GPS, in case you want to upload a photo or create a status update that shares your current location. That's fine and dandy, except that the app periodically forgets to turn off your phone's GPS once it's done using it, wasting precious battery power and leaving you scrambling for the nearest outlet. Even apps you aren't intentionally using may be running processes in the background that waste resources for no good reason.
Unfortunately, task killers are generally ineffective at combating this problem, so your only practical option is to open your app drawer and uninstall apps that you don't regularly use. Doing so will open up space on your phone for more music, videos, and pictures, and it will help reduce the number of apps that are running in the background.

Clean Out Your Memory Card

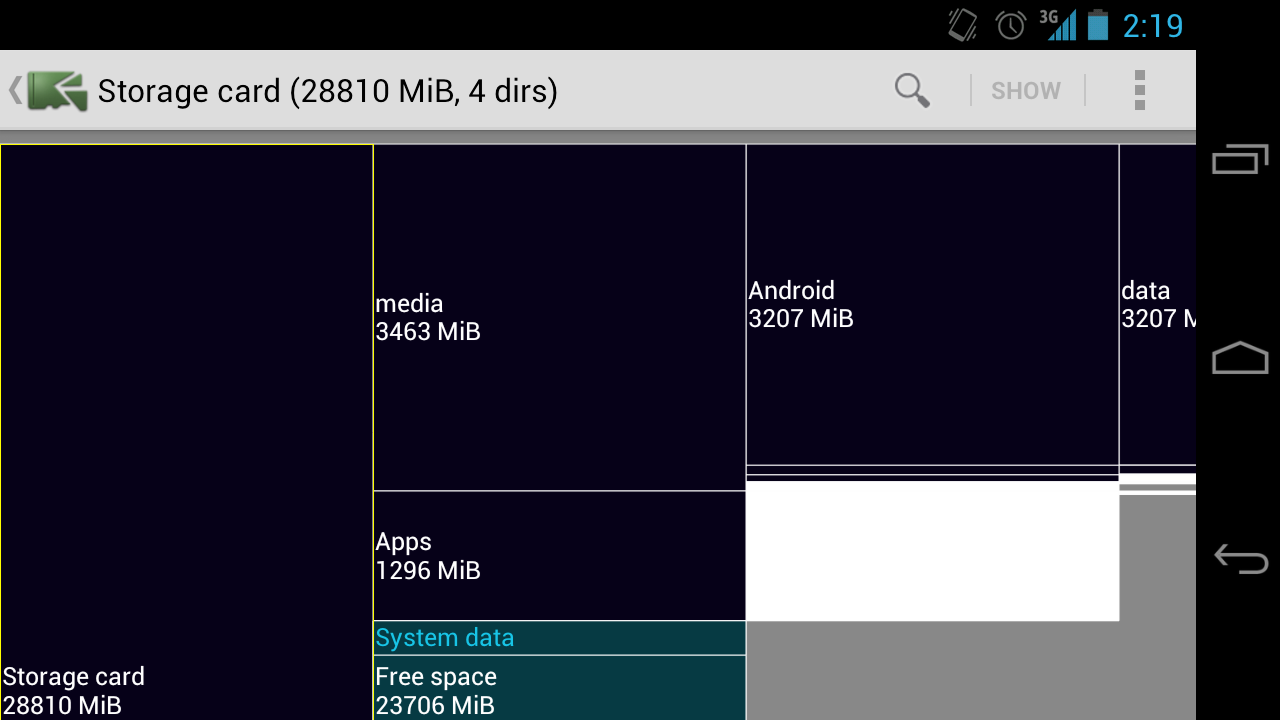
Cleaning out your SD Card may not boost your phone's performance, but it makes sense to remove any old or unused files that are just taking up space on the card. To identify the biggest hogs on your memory card, I recommend installing DiskUsage. This app shows you which files on your phone are taking up the most room, though you'll have to plug your phone into a computer or use a file browsing app (such as Astro) to delete the unneeded files.
Android phone maintenance: Cleaning out your memory card; click for full-size image.DiskUsage shows you what's on your SD Card.
You should do this whenever you uninstall applications, largely because some apps leave folders of data behind when they're uninstalled. If your phone is rooted, you can download the SD Maid app to automatically clear out old junk files. SD Maid also lets you freeze or remove any bloatware that came preinstalled on your smartphone--so you can finally get rid of the annoying Blockbuster app that continually asks you for updates.

Root Your Phone

If you don't mind voiding your warranty, rooting can breathe new life into an ancient Android phone. We've described how to root your Android phone countless times in the past, so you can refer to one of those guides when you're ready to walk through the actual process. A rooted phone gives you complete control over your Android device: You can remove unwanted bloatware, install root-only applications, and even load custom ROMs that change the look and feel of Android on your phone.
Another benefit of rooting is that you no longer have to depend on your carrier for Android updates. While everyone else is waiting for their phone to receive Android 4.0, you can probably find a ROM for your phone that will give you a taste of Ice Cream Sandwich a few weeks or months before the update officially appears.
Rooting isn't without its hazards, however, and a serious mistake can render your phone unusable. In my opinion, though, the benefits are worth the risks, especially if you have an older Android phone; it's definitely an option you should consider if you aren't satisfied with your current Android situation

Android Keyboard Shortcuts: All The Hotkeys You Need


Android Keyboard Shortcuts: All The Hotkeys You Need

Android
The Android mobile operating system has an impressive set of keyboard shortcuts to help you fly through your phone without digging through the menus. A couple of quick key presses are all you need for most common tasks.


(Note: Some hotkeys may vary from one Android device to another. Most of the ones listed here, however, should work on any Android handset.)So what are you waiting for? Bookmark this list and get to know Android in a whole new way.

Android Keyboard Shortcuts: Scrolling
• Spacebar: Page down in any Web page/document view
• Shift + Spacebar: Page up in any Web page/document view

Android Keyboard Shortcuts: Typing

• Alt + Spacebar: Insert a special character
• Shift + Del: Delete the character to the right of the cursor
• Alt + Del: Delete an entire line
• Shift + Shift (press it twice): Activate caps-lock; press shift once more to exit
• Alt + Trackball-Left: Move cursor to beginning of line
• Alt + Trackball-Right: Move cursor to end of line
• Alt + Trackball-Up: Move cursor to top of page
• Alt + Trackball-Down: Move cursor to bottom of page
• Shift + Trackball-Left/Right: Highlight text for cutting or copying
• Menu + X: Cut text (will cut all text on-screen unless specific characters are highlighted)
• Menu + C: Copy text to clipboard (will copy all text on-screen unless specific characters are highlighted)
• Menu + V: Paste text from clipboard
• Menu + A: Select all text in the current field

Android Keyboard Shortcuts: Browsing

• Menu + I: Zoom in
• Menu + O: Zoom out
• Menu + J: Go back a page
• Menu + K: Go forward a page
• Menu + R: Refresh current page
• Menu + F: Find on page
• Menu + B: Open bookmarks
• Menu + S: Open social network sharing menu
• Menu + H: View browsing history
• Menu + S: Open browser settings

Android Keyboard Shortcuts: Gmail

• F: Forward current message (works only while inside the message)
• R: Reply to current message (works only while inside the message)
• A: Reply-all to current message (works only while inside the message)
• Y: Archive message (works from within message or while on main inbox list)
• Menu + U: Refresh inbox
• Menu + C: Compose new e-mail
• Enter: Open an e-mail (from the main inbox list)
• Alt + Trackball-Up: Jump to top of inbox
• Alt + Trackball-Down: Jump to bottom of inbox
Android Keyboard Shortcuts: Apps
• Search + B: Open browser
• Search + C: Open contacts
• Search + E: Open e-mail
• Search + G: Open Gmail
• Search + I: Open calendar
• Search + M: Open maps
• Search + P: Open music
• Search + S: Open text messaging
• Search + Y: Open YouTube
You can also customize the keyboard shortcuts for applications: Just go into "Applications" off the main system settings menu, then select "Quick Launch." From there, you can change any of the above app-controlling hotkeys and add in your own.